The Art of Homemade Pasta
If you have never tasted your own pasta made from scratch at home, you will soon realise that with a little flare and finess you can enjoy a whole new world of quality and flavour.
Making pasta at home might seem like a lot of work but is actually very easy and can be done in batches ahead of time or quickly on the go for instant flavour sensations. It is a fun way to spend an afternoon with friends and can be stored in an airtight jar for several months.
Ingredients
The basic pasta recipe really only involves two ingredients – flour and water but you can make pasta with different types of flour. I have successfully made it with just plain flour from the supermarket but Durum Flour is best for its elasticity and storage ability. Bellata Gold Milling sells Durum Flour from Tamworth Australia in 5 and 20kg bags. Durum wheat is ideal for making pasta shapes that use fillings such as ravioli, cappelletti, tortellini, and cannelloni because it holds its shape extremely well once filled. Unfortunately Durum Flour is not always easy to find, often imported, and is certainly not a feature in the big supermarkets.
Some other flours you may find useful include Durum semolina, triticum durum and wholemeal flours with a grind of 00. A list of other sellers of flours suited to pasta making is at the bottom of the page but it is by no means exhaustive.
Things to take into account
Most basic recipes begin with a ratio of 2:1 of flour to water eg 400g flour (by weight) to 200ml of water. Be careful that you actually weigh your flour as it is not as simple as the printed weight on the bag eg 1 cup(250ml) of supermarket plain flour only weighs 145gr – see the difference.
The aim is create a dough that is well held together, stretchy, not sticky but not too dry. Allow 100g of flour per person for a main course such as bolognaise or similar.
The quantity of water will vary slightly for wholemeal flour but start with an extra 30ml of water per 400gr of flour. You will soon get a feel for it. Remember also that the density of flour changes with altitude and humidity so always weigh your flour first.
If you are using a stone milled unbleached flour you may need an extra 10-20ml of water. Rye flour is only suitable as an addition to other flours not on its own when making pasta as it is not friable enough so only add around 50g rye flour to 350g unbleached or standard flours.
For richer flavour substitute eggs for water – just crack your eggs into the measuring jug to judge the liquid. I tend to use 1 egg per person and top up with water if necessary.
Basic Pasta Dough
Ingredients:
400g sifted flour
200 – 230ml water or eggs or combination
Place the sifted flour in a bowl and make a well in the centre. Add liquids (including eggs if you are using them) and using a fork begin slowly combining the mixture from the centre out. Continue mixing until a sticky dough is formed.
Flour your hands only and turn out the dough onto a board for kneading. Don’t add any extra flour at this stage – knead by using the palm of your hand and stretching the dough out and along the surface, then dragging it back. Give it a quarter turn and repeat. It is important to knead the dough fully in this manner for 10 minutes.

Once the dough has become smooth and glossy – you both get to take a 30 minute break. Up end your mixing bowl over the dough to prevent it from drying out and rest for 30 minutes. This gives the gluten in the dough time to rest and will make it easier to work with.
The dough can now be shaped to create a variety of pasta styles. The easiest is the lasagna sheet and it forms the basis for most other styles as well.
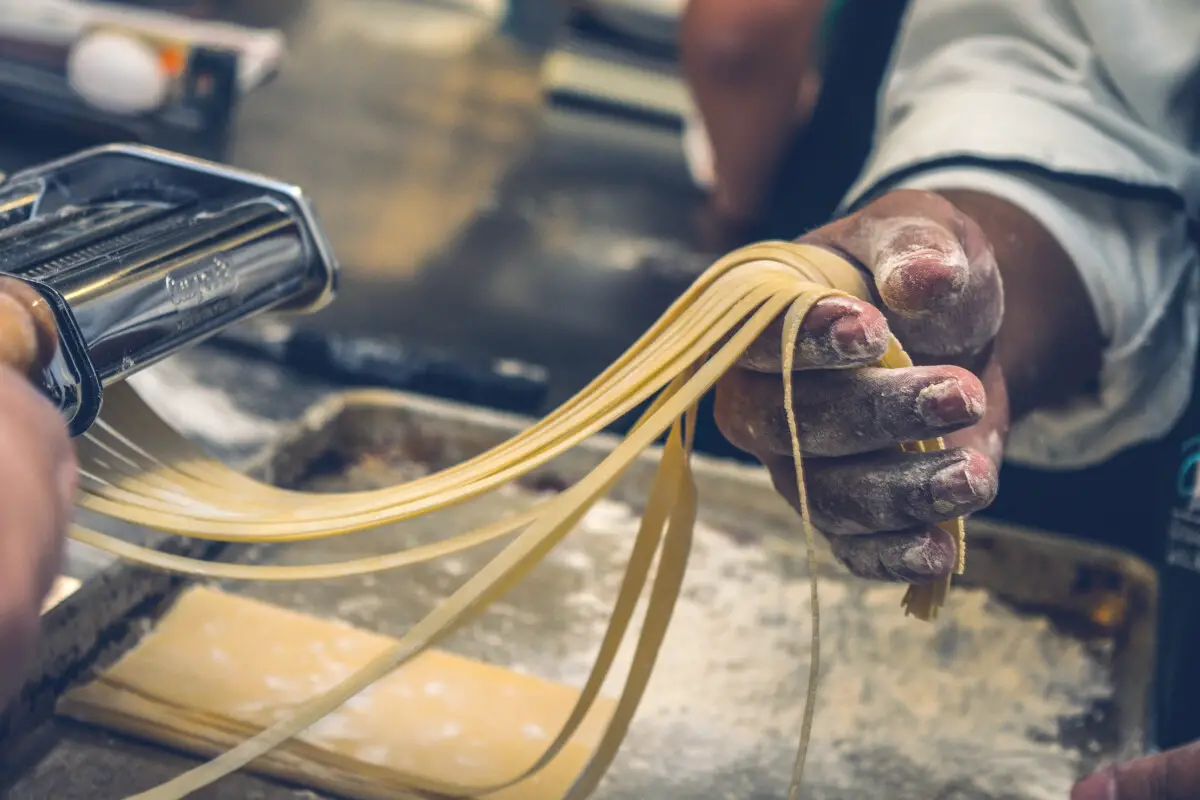
Using the Pasta Machine
Using a rolling pin is fine if you don’t have a pasta machine but I find it quick and easy to use the machine and well worth the investment. If you would like to purchase your own machine here is a link to the best machine I have found. Alternatively follow the same steps as below and aim for final thickness of around 2mm.

You will notice your pasta machine has at least 3 spots for the crank handle. In the beginning you will always use the main crank area that has the adjustable thickness dial on the opposite side. In the photos you will see that I have the secondary attachment in place for cutting the final product but you do not need this if you are doing lasagna sheets or other shapes. Just for making Angels Hair (spaghetti) or Fettuccine.
Begin by cutting your dough into 4 equal pieces using a sharp knife. Take just one of the quarters to work with and leave the others under your bowl so they don’t dry out. Using your hand or rolling pin flatted the dough to roughly 10m x 15cm (depending on your pasta deck size, mine is 18cm wide). Lightly flour both sides of the dough before proceeding.
Put the dough through the machines according to the instruction for your machine. If you are using the same model as me start at setting number 7. Feed it gently through the rollers as you crank the handle and then return it to the board. Fold it back onto itself in thirds and feed the shortest side through the rollers a second time. Redust the dough as needed – you don’t want it to stick to the rollers. Repeat this process 5 times on the number 7 setting.

Now if you are making lasagna sheets you can begin to feed through again and slowly work your way through the thickness settings till you reach number 3. If it becomes to long and unmanageable just cut it in half and continue. Each time you adjust the dial the sheet will become thinner and longer. When you are happy with the thickness eg 2mm or less lay it flat and cut into 10cm lengths, dust well with flour and place on a teatowel dust side down.
Continue till all the dough is used and place a second tea towel on top then weigh down with a cake rack or pan. This will stop it from curling while it dries. You can of course use the lasagna sheets immediately without needed to precook – just make sure you have enough sauce to completely cover the pasta and it is not too dry. Alternatively, dry and store for later use. If dried precook by plunging in boiling water for 1 min before proceeding.
More than Lasagna

Now if you are following on with me I made Nasturtium Fettucini which is why you will see the picture above has some interesting discoloration to the pasta. You don’t have to use nasturtiums that’s just what I had on hand – you can be inventive or plain up to you. I have done plain, sweet potato cannelloni, nasturtium fettuccine, and spinach tagliatelle. All were fantastic. Let your imagination run wild. Here is how I did it.

Edible flowers are a particular favorite of mine and this Nasturtium Fettucini was fantastic with a light ricotta based sauce and some fresh nasturtium leaves and flowers.
Ok you are at the stage of passing the dough through the first 2 times. Now before you progress with folding and rolling press some nasturium or other edible flowers into the dough and then continue folding and rolling as above.


Pass your pasta through the machine at least 3 times but I found 5 was better for dispersing the flowers. Once you have done this begin passing the dough through the rollers gradually stepping through the thicknesses until you reach number 2 or 3. The dough will continue to get longer and thinner on each pass so if it becomes unmanageable just cut it in half and work with one piece at a time. Remember to dust lightly with flour.
Once you get to the required thickness you are going to decide what cut you are after – I used the fettucini cutter for this example. Move your crank handle to cutter and roll slowly through – an extra pair of hands is useful with this to catch the strands underneath.

Now a word of advice. If you don’t like the cut simple bunch it all back up and start over to get the result you are after. Pasta making is very forgiving in that regard. The picture above shows the first cut through the cutter. See how some are broken or not quite uniform – I simple balled it all back together and ran it again. One tip is to use a ruler and knife to cut of scraggy edges before putting the dough through the cutter. I used double the length of dough that I wanted for the final product to facilitate drying see picture below. What is important is that the hanging or drying phase is done in a well ventilated space and the pasta is not overlapping. If they stick together, well you know what happens to pasta that is not cooked right and all stuck together. The same thing will happen with the drying process.

Drying took around 2 hours and then it was ready to go into the glass jar for storage. We ate some of this around a week later and it was simply divine.
Cooking your homemade artisan pasta
Fresh – Once the chosen pasta shape is made, simply drop into boiling, salted water with a dash of olive oil and cook for 2-3 minutes or until it floats. I love fresh pasta with good quality olive oil and parmesan cheese and this is the perfect way to experience the specialty flavours you have added to your artisan pasta. Bon Appetito!
Dried – Home made pasta that has been air dried will take approximately the same cooking time as store bought pasta depending on thickness. I found the fettucini took a couple of extra minutes from the dried store bought one but that suited me just fine.

Making artisan pasta at home is a great activity to do with friends and family, like most other projects involving spending time together. It opens the door for not only the love of food but for important conversations and builds a sense of resilience and intimacy. Give it a try.
I would love to hear how you go and see pictures of your Artisan Pasta Combinations. Drop us a line or send some photos to me at kym@readytoadapt.com